Smart video doorbell cameras have moved away from being a fun, innovative product. As market statistics reported by Statista, the active user base of smart home security devices has passed the 400 million mark, with video doorbell cameras contributing a substantial chunk to the total sales. Arlo, as a brand, is concentrating on the development of more high-resolution cameras as well as their cloud-based analysis. Because of this, the process of Arlo video doorbell installation is not that complicated.
This tutorial includes not only the process of Arlo video doorbell installation, but it also covers why some of these steps are important from a technological standpoint. Regardless of whether you own a wireless or wired version of this device, it is essential to have technological knowledge to avoid making some pitfalls.
Understanding Arlo Doorbell Hardware Architecture
Before the Arlo video doorbell installation begins, it helps to understand what makes Arlo devices different. Arlo video doorbells operate as edge devices that rely heavily on Wi-Fi stability, cloud authentication, and real-time video encoding.
The product lineup includes:
- Arlo Video Doorbell 2nd generation, which improves Wi-Fi radios and low-light processing
- Arlo Essential wired video doorbell, designed for continuous power and consistent uptime
- Or, arlo video doorbell 2k, which increases pixel density and field-of-view
- Arlo wired video doorbell / arlo video doorbell wired, both relying on transformer-based power
- Arlo 2K wireless video doorbell, which uses battery power and adaptive bitrate streaming
Each model follows the same onboarding logic, but the power source directly affects installation complexity.
Pre-Installation Requirements That Actually Matter
Many Arlo video doorbell installation failures happen before mounting even begins. Arlo’s research data shows that a large percentage of setup issues are caused by network or power assumptions.
Before starting how to install Arlo video doorbell, confirm the following:
- Wi-Fi signal strength at the door location exceeds −65 dBm
- Router supports 2.4 GHz (required for initial pairing)
- Smartphone OS and the Arlo app are updated
- Doorbell transformer meets voltage requirements (for wired models)
Skipping these checks often leads to pairing loops or offline errors after installation.
Installing an Arlo Wired Video Doorbell: Technical Considerations
For homes with existing doorbell wiring, an Arlo wired video doorbell installation offers continuous power and faster wake times. However, the wiring step must be done correctly to avoid voltage drop or boot failure.
The process involves:
- Shutting off the power at the breaker
- Removing the existing chime and faceplate
- Connecting low-voltage wires to the Arlo mounting plate
- Securing the Arlo video doorbell wired unit
Once power is restored, the doorbell immediately enters pairing mode. At this point, the Arlo app establishes a secure handshake between the device, Wi-Fi network, and Arlo cloud servers.
The same process applies to the Arlo Essential wired video doorbell, although firmware updates may run automatically during first boot.
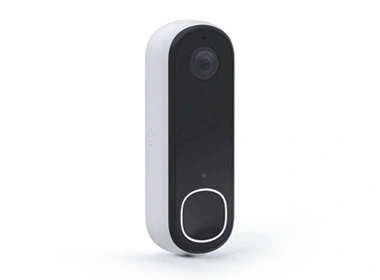
Installing the Arlo Video Doorbell 2nd Generation
The Arlo Video Doorbell 2nd Generation also comes with more advanced image sensors. This results in its initial setup process involving firmware sync, which might take a few minutes.
In this stage, ensure there is no break in power and Wi-Fi connectivity. Installing firmware updates overwrites the core system modules, and this may lead to a delay in the activation process.
It finally connects successfully and completes the how to install Arlo video doorbell process, allowing the device to start the live video stream.
Arlo Video Doorbell 2K and Network Bandwidth Planning
The Arlo Video Doorbell 2k transmits higher-resolution video, which places a greater demand on upstream bandwidth. While Arlo dynamically adjusts bitrate, poor upload speed can cause lag or delayed alerts.
For optimal results:
- First, the upload speed should exceed 2 Mbps
- Next, the doorbell should connect directly to the main router, not a weak extender
- Finally, avoid heavy upstream usage during setup
These considerations reduce latency and improve clip recording reliability.
Installing the Arlo 2K Wireless Video Doorbell
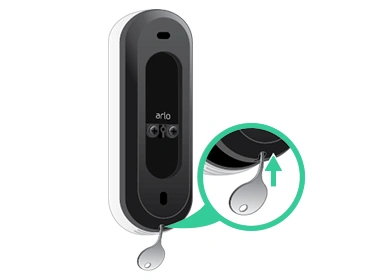
The Arlo 2k wireless video doorbell eliminates wiring but introduces battery management as a factor. Installation is mechanically simpler, yet placement becomes more critical.
After the battery is charged, the installation process includes the mounting of the plate and the snapping of the device into position,” explains an IT professional.
“Technologically speaking, the use of robust sleep cycles allows the devices to save energy, as the quality of the Wi-Fi connection directly correlates to the devices’ responsiveness,” says an IT expert.
This ensures fewer nighttime awakenings, as well as a longer battery lifespan.
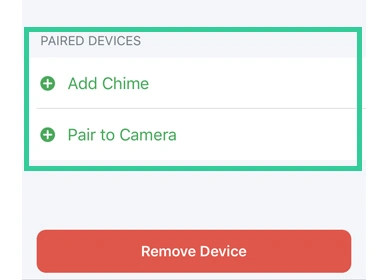
App Pairing and Cloud Registration Flow
Once mounted, all models follow the same digital onboarding sequence. The Arlo Secure app performs device discovery, Wi-Fi credential transfer, and cloud registration.
If pairing fails:
- First, ensure the phone remains on the same network
- Also, disable VPNs and DNS filters
- Stay within close range of the doorbell
Most pairing issues resolve once network conditions stabilize.
Testing and Calibration After Arlo Video Doorbell Installation
After Arlo video doorbell installation, testing ensures the system performs as designed. This step is often overlooked, yet it validates both hardware and software functionality.
Test:
- First, live video stream
- Next, check the motion detection range
- Additionally, doorbell press latency
- Finally, two-way audio clarity
Calibrating motion zones after installation reduces false alerts and improves accuracy.
Maintenance Steps Post Arlo video doorbell installation
Arlo provides frequent updates of its firmware that improve motion detection and video processing, among other aspects of home security. Upgrading your device ensures that you get the best experience.
In addition:
- Check Wi-Fi signal strength periodically
- Clean the lens to ensure image clarity
- Check battery life in wireless devices
These help to ensure consistent levels of performance.
Final Thoughts
A successful Arlo video doorbell installation depends on more than mounting hardware. It requires understanding power delivery, Wi-Fi behavior, and cloud-based device registration. When installed with these factors in mind, Arlo doorbells deliver reliable video, accurate alerts, and long-term stability.
Whether installing the Arlo video doorbell 2nd generation, the Arlo essential wired video doorbell, or the Arlo 2k wireless video doorbell, following a technically informed approach ensures the system performs as intended from day one.